Introduction
When dealing with iOS development, it’s very important to understand how the system works under the hood. This article explains how the system handles UI-related events.
In this article we consider:
- What are
UITouchandUIEvent? - What is the Responder Chain?
- What is Hit Testing?
- How does
UIViewhandle user events? - What is the Main Event Loop?
Table of contents
Open Table of contents
UIKit
Let’s start with a definition of UIKit:
UIKit provides a variety of features for building apps, including components you can use to construct the core infrastructure of your iOS, iPadOS, or tvOS apps. The framework provides the window and view architecture for implementing your UI, the event-handling infrastructure for delivering Multi-Touch and other types of input to your app, and the main run loop for managing interactions between the user, the system, and your app.
UIKit helps us to create a hierarchy of windows and views, create infrastructure to handle user actions, and create a main event cycle.
UIApplication is the centrilized point of control and coordination for apps running in iOS. Every application has exactly one instance of UIApplication that conforms to the UIApplicationDelegate protocol, which informs about important events. (You can read more about UIApplication here).
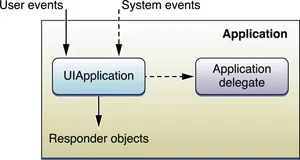
UIApplicationMain creates the application object and the application delegate and sets up the event cycle.
UIApplicationMaincreates an instance ofUIApplicationand stores it for future use.UIApplicationMaincallsapplication(_:didFinishLaunchingWithOptions)that tells the launch process is almost done and the app is almost ready to run.- If an application doesn’t use a storyboard, we need to set up the view controller manually and call
makeKeyAndVisibleon theUIWindowinstance.
To begin with iOS 13 the UIScene and UISceneDelegate were introduced for supporting multi-windows apps on iPads.
UISceneis an object that represents one instance of your app’s user interface. TheUISceneDelegatewill be responsible for what is shown on the screen (Windows or Scenes) handle and manage the way your app is shown.
UIApplicationMaincallsapplication(_:didFinishLaunchingWithOptions).UIApplicationMaincreates aUISceneSession,UIWindowSceneand a class serves as a delegate for the scene.- The Info.plist contains information about which class will act as delegate.
UIApplicationMainchecks whether the application uses Storyboards.- f the scene has a storyboard, the
UIApplicationMaincreates a new instance of UIWindow and sets it as a delegate for that scene. UIApplicationMaincalls UIWindow’smakeKeyAndVisibleto display the scene to the user.- The delegate calls scene’s method
scene(_:willConnectTo:options:).
When the application detects a system event, such as a touch, UIKit creates a new instance of UIEvent and sends it to the main event loop through UIApplication.shared.sendEvent(_:).
UITouch
UITouchis an object representing the location, size, movement, and force of a touch occurring on the screen.
UITouch has five main state like this:
beganindicates that a finger has touched the screen for the first time. This phase becomes only once.movedindicates that the finger has moved over the screen.stationaryindicates that the finger hasn’t moved since the previous event.endedindicates that the finger has lifted from that screen. This phase becomes only once.cancelledthe system has interrupted the stream of touches. For example, the user taps a Home button.
Once a UITouch is created, the application detects which view it is connected to. The UIView is then set as the view for the UITouch, and this touch event remains associated with that view until the finger is lifted from the screen.
UIEvent
UIEventis an object that describes a single user interaction with your app.
UIEvent represents a single UIKit event that contains a type (touches, motion, remote control, presses) and an optional subtype (none, motion shake, remote control play, remote control pause, remote control stop, remote control toggle play pause, etc).
UIEvent may have multiple touches, previous touches, coalesced touches.
Main Event Loop
After running, the application setups an infrustructire for the main run loop. When the application is launched, it also establishes the main group of objects responsible for rendering the UI and handling events. These core objects include the window and various types of views.
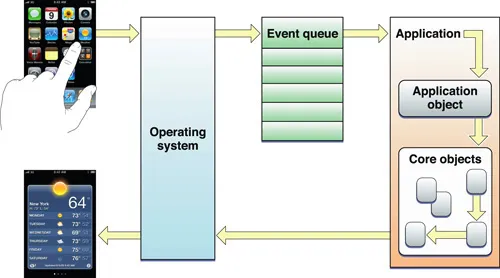
Once the application receives an event from the main event loop, it sends it to the window that reproduced it. The window then sends the event to an appropriate view that triggered this event. iOS uses a hit testing mechanism to find the appropriate view. Let’s see how it works.
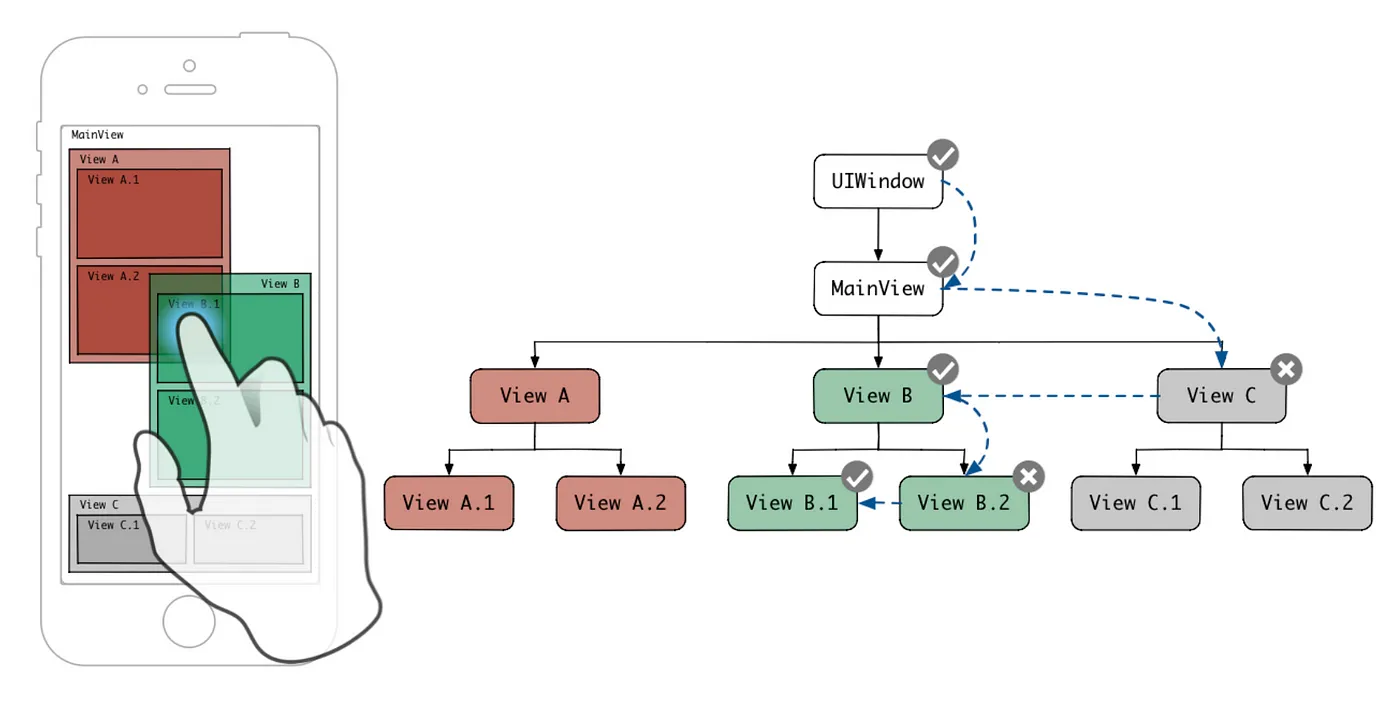
Hit Testing is finding the view in which touch event is occurred.
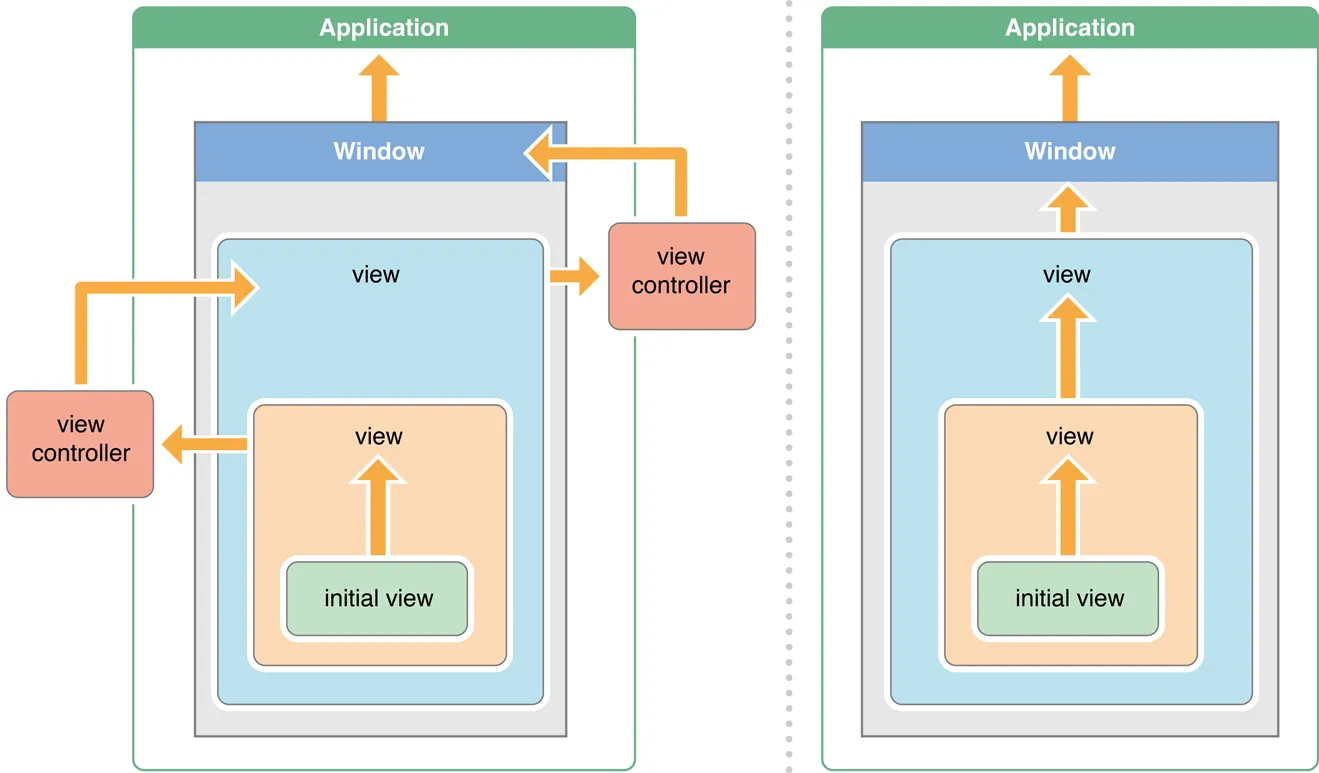
Once an event occurs, it passes to the app’s responder objects for handling. UIKit manages most responder-related behavior automatically, including how events are delivered from one responder to the next. The process starts at the lowest level, the UIApplication. Then, it passes into UIApplicationDelegate, which can find an appropriate window instance. Afterward, it propagates up the view hierarchy and checks for each view if the touch happened within its bounds. The last view in this process receives the touch event. If the view isn’t able to respond to this event, it will be sent to the next responder using the Responder Chain.
UIKit utilizes the hitTest(_:with:) method to determine the appropriate view in its hierarchy for handling an event. Subsequently, the point(inside:with:) method assesses whether the event’s point falls within the boundaries of the UIView. In the event that the point(inside:with:) method returns nil, it will propagate the nil result to the hitTest(_:with:) method, causing it to return nil as well. This interplay ensures accurate event handling within the UIView hierarchy.
After finishing above process, view which is detected by hit testing is given opportunity to handle events as first responder.
Responder Chain
UIResponder is an abstract interface that handles events in an application. Here are some of the responder objects that are most commonly used:
UIWindowUIViewControllerUIViewUIControlUIApplication
In order for a responder to start receiving events, it must implement the necessary handler methods:
// All UIResponder classes which are using the custom touch events should override these methods.
open func touchesBegan(_ touches: Set<UITouch>, with event: UIEvent?)
open func touchesMoved(_ touches: Set<UITouch>, with event: UIEvent?)
open func touchesEnded(_ touches: Set<UITouch>, with event: UIEvent?)
open func touchesCancelled(_ touches: Set<UITouch>, with event: UIEvent?)


// All UIResponder classes which are using the custom press events should override these methods.
open func pressesBegan(_ presses: Set<UIPress>, with event: UIPressesEvent?)
open func pressesChanged(_ presses: Set<UIPress>, with event: UIPressesEvent?)
open func pressesEnded(_ presses: Set<UIPress>, with event: UIPressesEvent?)
open func pressesCancelled(_ presses: Set<UIPress>, with event: UIPressesEvent?)


// All UIResponder classes which are using custom motion like shake needs to override these methods.
open func motionBegan(_ motion: UIEvent.EventSubtype, with event: UIEvent?)
open func motionEnded(_ motion: UIEvent.EventSubtype, with event: UIEvent?)
open func motionCancelled(_ motion: UIEvent.EventSubtype, with event: UIEvent?)
open func remoteControlReceived(with event: UIEvent?)
Responders receive some data about an event and should decide whether to handle this event or pass it to the next responder in the list.
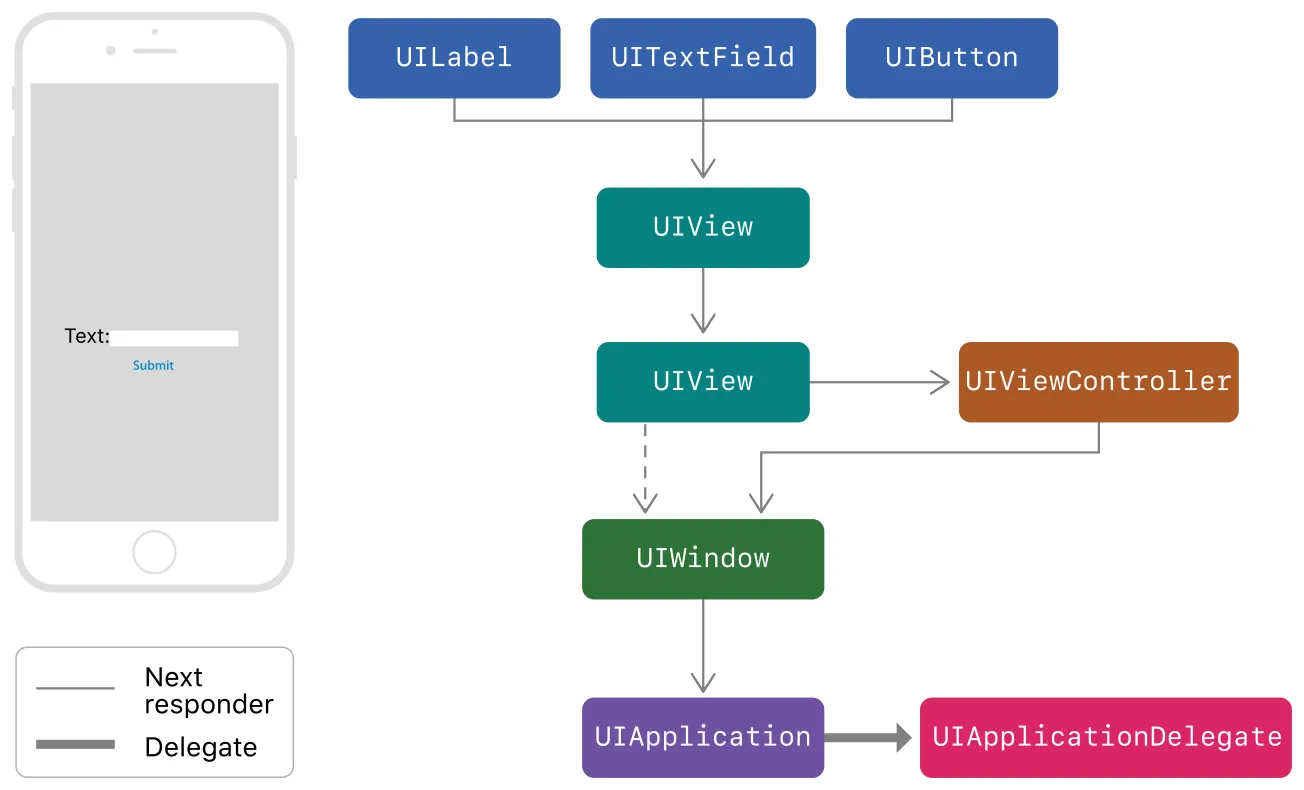
If an event cannot be handled by the responder, it will be sent to the next responder. The event moves up to the top-most responder, and if no responder can handle the event, it is simply removed.
Gesture Recognizers
The process of detecting gestures is a rather complex mechanism. A solution for these types of tasks is gesture recognizers, which define a set of general user gestures and encapsulate the logic for handling them.
A Gesture Recognizer is an object that recognizes a sequence of touches as a single gesture. You can add or delete a gesture to a view using following methods: addGestureRecognizer(_:) or deleteGestureRecognizer(_:).
UIGestureRecognizer isn’t a responder, which means it doesn’t take part in the Responder Chain. Simply speaking, it’s a dictionary that contains all gestures.
Cases
Passing events through view hierarchy
What is the difference between these two lines of code?
// 1
button.addTarget(nil, action: #selector(test), for: .touchUpInside)

// 2
button.addTarget(self, action: #selector(test), for: .touchUpInside)
The first line of code will find an object that can perform the test method using the Responder Chain. If there is no object that can perform this action, the action will not be executed.
The second line of code means that the test method is implemented within the current target, and in case it doesn’t exist, the application will result in a crash.
Extend a tap area
We can expand the tappable area by overriding the point(inside:with:) method as follows:
override func point(inside point: CGPoint, with event: UIEvent?) -> Bool {
  let margin: CGFloat = 55
  let area = self.bounds.insetBy(dx: -margin, dy: -margin)
  return area.contains(point)
}
Passing a touch event through a view
In order to pass a touch event through a view, you can override the hitTest(_:with:) method as follows:
override func hitTest(_ point: CGPoint, with event: UIEvent?) -> UIView? {
    let view = super.hitTest(point, with: event)

    if view == self { return nil }

    return view
}
Passing an event outside the parent’s bounds
What happens when the user clicks on a view, C, that goes out of bounds?
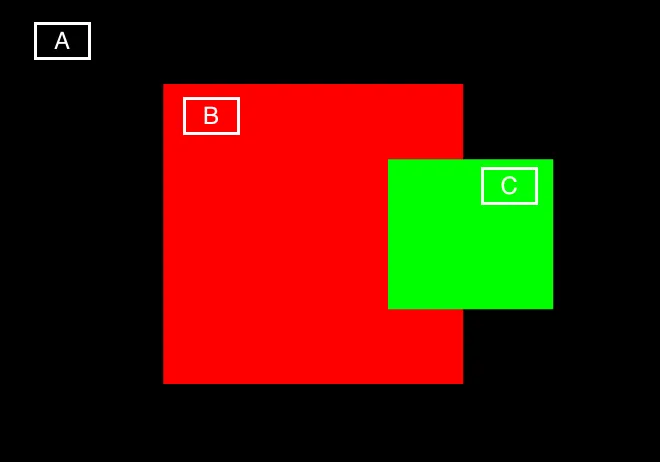
If a touch location is outside of a view’s bounds, the
hitTest(_:with:)method ignores that view and all of its subviews. As a result, when a view’sclipsToBoundsproperty is true, subviews outside of that view’s bounds aren’t returned even if they happen to contain the touch.
According to the documentation, this tap will be ignored because the tap’s location is outside of B’s bounds. To fix this, you can do something like the following:
override func hitTest(_ point: CGPoint, with event: UIEvent?) -> UIView? {
    if let subview = findViewContainingPoint(parent: self, point: point, event: event) {
        return subview
    }

    if self.point(inside: point, with: event) {
        return self
    }

    return nil
}

private func findViewContainingPoint(parent: UIView, point: CGPoint, event: UIEvent?) -> UIView? {
    let subviews = parent.subviews

    guard !subviews.isEmpty else {
        return nil
    }

    for subview in subviews.reversed() {
        let convertedPoint = parent.convert(point, to: subview)
        if subview.point(inside: convertedPoint, with: event) {
            if let foundView = findViewContainingPoint(parent: subview, point: convertedPoint, event: event) {
                return foundView
            } else {
                return subview
            }
        }
    }

    return nil
}
Summary
In this session, we explored hit testing, its connection to the responder chain, the role of UIResponder, and how to customize hit testing for specific scenarios.
Thanks for reading
If you enjoyed this post, be sure to follow me on Twitter to keep up with the new content.
